Home:
Welcome. This page is here to provide you with a step-by-step guide to create and link a Named Anchor (NA), but before we begin lets answer a couple of questions.
What is a Named Anchor?
A Named Anchor is a link to different sections of a document or webpage that allows the user to jump to a specific area of the document without having to scroll.
How/why/when is a Named Anchor useful?
Named Anchors are useful for large documents that a user has to scroll through in order to read. They are especially handy for documents that are divided into sub-sections on one page that a user might want to jump around in rather than read as is on the screen.
What do I need to create a Named Anchor?
In order to create a Named Anchor you are going to need Macromedia Dreamweaver MX 2004 installed on your computer as well as a document that you wish to create links inside of.
Part 1—Creating a Named Anchor:
To create a Named Anchor in Macromedia Dreamweaver MX 2004 follow the steps below.
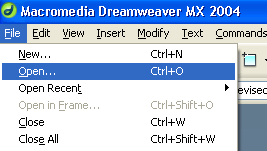
*Before you begin: Open Dreamweaver MX 2004 and select the existing file you wish to create a Named Anchor in, for this tutorial we are going to use the file genreanalysis.html. (In Dreamweaver select Open from the File menu and select genreanalysis.html).
-
Begin by inserting a table at the top of the document. The content of the table will serve as the links to the Named Anchors within the document.
-
Place cursor at desired location
-
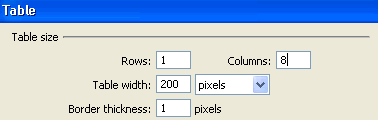
Choose Insert, Table
-
Enter 1 in rows box, __ in columns box (the number of columns will depend on the number of sections in your document that will receive a Named Anchor), for this tutorial our document is going to have 8 sections.
-
Click OK
-
Insert the section names of your document in the cells of the table
- Starting in the first cell enter:
- Overview
- Writers & Developers
- Audiences & Users
- Format & Organization
- Level of Formality
- Visual Cues & Images
- Range of Variation
- Forecast
- Now you are going to insert Named Anchors after each heading in the document (one Named Anchor for each section of the document).
-
Place the cursor after the first heading in the document, for this tutorial place the cursor after Overview
-
Choose Insert, Named Anchor
-
In the Anchor Name Box enter overview
-
enter name without any spaces or symbols, just letters, i.e. writersdevelopers
-
-
An anchor symbol will appear next to the heading
-
Also notice that the Property Inspector box at the bottom of the page is now displaying an anchor and a name box with the name of your first Named Anchor.
-
Repeat steps 1 & 2 for the remainder of the sections
-
Save your changes after inserting all of the Named Anchors needed (select File, Save).

![]()


Part 2—Linking to a Named Anchor:
Now that you have created the Named Anchors in your document the next step is to create their links. There are two ways of linking a Named Anchor, but we are going to use the Point-to-File icon method of linking.
-
With your cursor, select (or highlight) the first section name in the table you created in Part 1. (The section name in the first cell should correspond with the first section in your document, so on and so on) For this tutorial select Overview.
-
Next, scroll down to the corresponding section in your document (scroll to the first Named Anchor you created).
-
With the section name in the table still highlighted, click on the Point-to-File icon in the Properties box at the bottom of the page and drag the cursor to the anchor symbol.
-
Release the mouse button
-
Observe the Link box at the bottom of the page
-
The anchor name should appear in the Link box with a # before it
-
-
Repeat steps 1-4 for the remaining Named Anchors that you created
-
Save your changes after linking all of your Named Anchors (select File, Save).


![]()
Part 3—Checking your work & Testing your links:
Now that you have created Named Anchors in your document the final step is checking to make sure your links work properly.
-
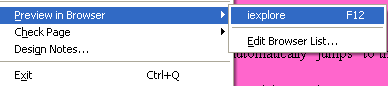
Assuming your Dreamweaver MX 2004 document is saved properly; preview the page in your browser.
-
Choose File, Preview in Browser, iexplore
-
Click on a section name at the top of the page
-
Notice how the page automatically “jumps” to the section selected
-
-
Repeat steps 1 and 2 for the remaining section names to make sure they are all linked to the proper section in the document.
Troubleshooting:
*Congratulations!
You have successfully learned how to create a Named link!