TEACHING WITH TESSELLATIONS
Tessellations can be very useful in education and in teaching mathematics. They can be used from kindergarten to high school. Creating tessellations does not depend largely on numerical skills; therefore students with many different levels of mathe matical abilities can create them. All students have an equal chance to make wonderful artwork and patterns with tessellations. The older the students, the more complicated the artwork and patterns can be. Just the problem solving, that is part of creatin g the tessellation patterns, makes it worth the time spent on teaching about them.
Since tessellations have patterns made from small sets of tiles they could be used for different counting activities. Students could count how many tiles are in a certain row (or square, or group, or triangle), they could count how many of the tiles ar e colored a certain color, or they could find a group of eight diamonds (or any other specified shape).
Two or more tiles usually make some other shape. So students could find some tiles that make a square, a large triangle, a hexagon, etc. Students could possibly find how many different shapes they could make with six (or any number) tiles. If the shape s are not the usual geometric shapes the students could sketch a picture of the design or shape that they found.
Tiles used in tessellations can be used for measuring distances. Once students know what the length is of the sides of the different tiles, they could use the information to measure distances. The tiles could be used to talk about perimeter. The studen ts could use the lengths to calculate perimeter of the different tiles or the perimeter of the shapes that they used the tiles to make. One thing that the students could do is to calculate the distance from one point to another in a tessellation if they h ad to walk a certain path on the cracks between the tiles. Another thing that students could do is to find a shape that has exactly 10 units (or any other specified number of units) for the perimeter.
Tiles that are arranged so there are no holes or gaps can be used to teach students that area is a measure of covering. Students could trace around a small set of tiles in a pattern and find that by counting the tiles they can tell how big the shape is . Students could compare many different shapes within a design and try to figure out which shape is bigger by using the idea that area is a measure of covering. Students could look for shapes with specified sizes. They could see how many different shapes they could make with an area of six rectangles (or any other specified area). Later students could be given one or two tiles as a unit of measure and using them they could calculate the area of a large design.
Ideas about area and perimeter can be combined for students to discover how they are different without using formulas. Students could find as many shapes as possible in a tessellation that have a particular perimeter and then see what they can discover about the areas of the shapes, using one tile as a unit. Another thing that students could do is to find as many shapes as possible with a particular area and see what they can discover about the perimeter of the shapes.
Tessellation patterns produce many lines of symmetry. See the picture below for examples of lines of symmetry (John VandeWalle & Charles S. Thompson, pg. 8). Students could find the lines of symmetry in the designs, they could see how many differen t designs have a particular number of lines of symmetry, or they could find the design with the most lines of symmetry. Colors could also be considered when looking for lines of symmetry.

With young children you could have them learn about tessellations with pattern block pieces of geometric figures such the square, rhombus, triangle, hexagon, and rectangle. You could create your own pattern pieces by cuttin g them out of corrugated cardboard. Students could put the shapes together so that they cover a surface completely. They could take one of the pattern pieces and trace it on a blank piece of paper then take the shape and line it up to one side of the trac ed shape and trace it again. Students could continue to do this until they discover that they could cover the whole piece of paper by doing this. They would also discover that there is no overlapping or places not covered. Another activity that younger st udents could do is to look through magazines and find pictures of tessellations. Then as a class, make a collage of the pictures that the students found.
An activity for older students is to use different types of pentagonal patterns and have them tessellate the different types. Have the students do some investigations to find that the sum of the angles at any one vertex is 360 degrees and that at least three of the pentagons meet at any one vertex.
For high school students you could have them discover what shapes tessellate and prove how they know that they do actually tessellate. They can discover that the angle measure at any point must be 360 degrees. An example of this is to have students fin d out if a regular pentagon would tessellate or not. They could calculate that the total angle measure of the pentagon is 540 degrees, which means that each angle of the pentagon is 108 degrees. Once the students know that each angle is 108 degrees they c an calculate whether or not 360 degrees is evenly divisible by the 108 degrees. Since 360 is not evenly divisible by 108 they can say that a regular pentagon does not tessellate. They could be asked to use this same process for other regular polygons to d iscover which ones will tessellate and which ones will not. Another thing that high school students could do with tessellations is to take a scalene triangle and tessellate it. When they put together two of the triangle they will get a quadrilateral (whic h is a parallelogram) and they could then be asked to prove that the quadrilateral is a parallelogram.
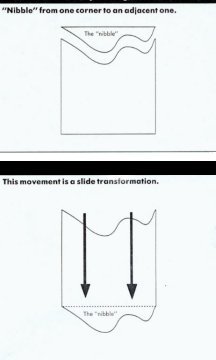
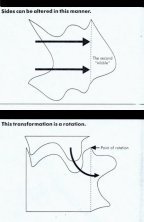
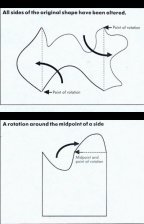
The "nibble" technique is a good way to help students develop their own tessellations. They can be anything from fairly simple to more complicated based on the age of the students. Students can learn about translations or slides and rotations or turns. Once the students have developed the shape that they want they can use it to make a tessellation. Once they have made a tessellation they can use their imagination and artistic ability to make their tessellation into a work of art by adding lines, marks, or colors. The pictures (Paul Giganti & Mary Jo Cittadino, pg. 9-11) below show how to use the different types of nibbles on a square. Be sure that students know that they can not have any scraps and that the tessellation shape has the same area as t he original shape.


Bibliography
Giganti, Paul and Mary Jo Cittandino. "The Art of Tessellation." Arithmetic Teacher (March 1990): 6-16.
Clauss, Judith Enz. "Pentagonal Tessellations". Arithmetic Teacher (January 1991): 52-56.
Van de Walle, John and Charles S. Thompson. "Letís Do It". Arithmetic Teacher (November 1980): 4-8.